
Maamoul – Middle Eastern date and nut filled cookies
Last Updated on March 22, 2025 by Jacqueline Rafidi
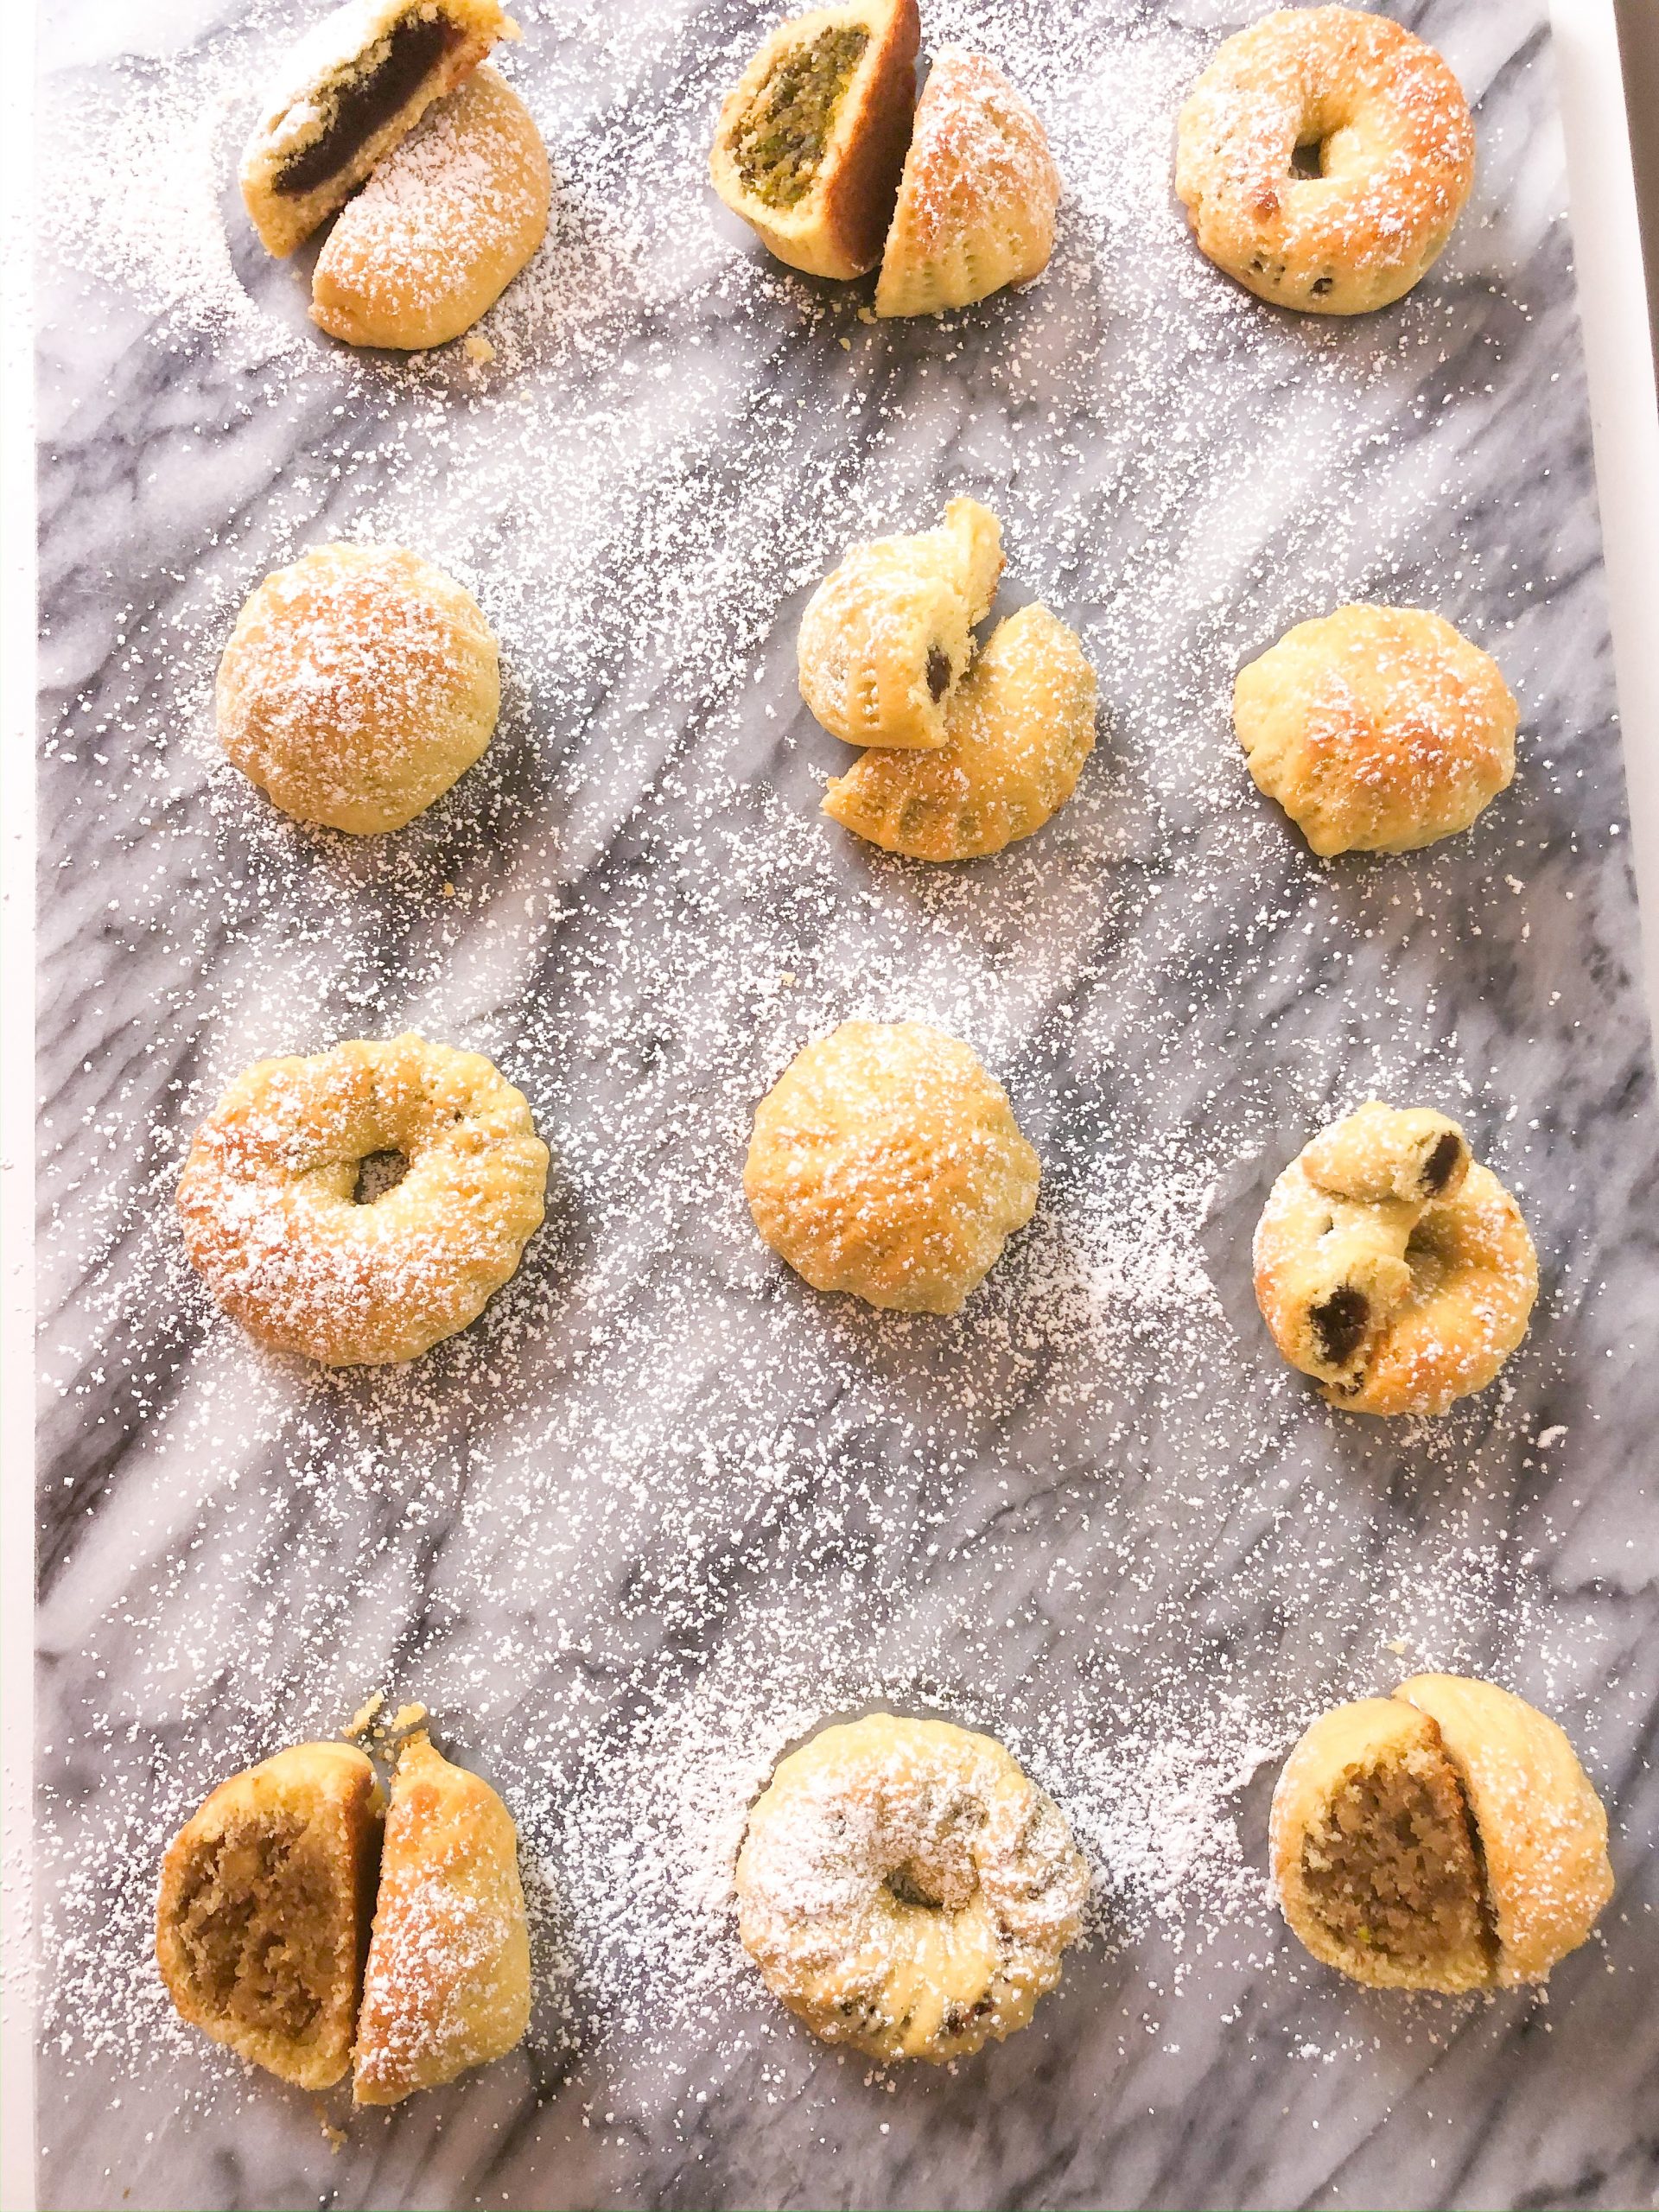
Maamoul cookies (also known as ma’amoul or ma3moul) are decorative, buttery Middle Eastern cookies filled with date paste, walnuts or pistachio filling and are often enjoyed during special occasions and religious holidays Easter or Eid al-Fitr.
There’s something magical about the aroma of maamoul cookies baking in the oven, the beloved
Middle Easterns dessert. Making ma’amoul cookies is a labor of love, but filled with memories of family and loves ones gathered around the table in an assembly line. Easter is my favorite holidays and these cookies are so traditional and symbolic for us. These do take time and patience, but the best part about these is making them with family and friends. Every year, we would all gather around our kitchen tables with our tea, each person has a task from shaping the dough or filling, wrapping the two together, or creating the beautiful design on the exterior just deep enough without the filling peeking through (which usually was left to us kids).
They’re then baked until golden brown with anticipation from everyone in the room. The sweet reward of biting into these golden brown, slightly crumbly, and perfectly spiced cookies makes the effort completely worth it. They’re a must-have on the kitchen table for holiday gatherings. I KNOW you will love this recipe as I meticulously created it to satisfy my taste of a non-crumbly dough. My family and I absolutely love it and can’t wait for you to recereate it and make memories in your home as well!
This is a list of everything you need to know about making these traditional cookies at home, from the maamoul dough to the baking process and even how to store them properly for later enjoyment.
What is Maamoul?
Maamoul is a delicate pastry made with a combination of fine semolina and all purpose flour, giving it a unique melt-in-your-mouth texture. It is typically filled with date filling, pistachios, or walnuts and then hand-shaped or pressed into special molds that imprint intricate designs onto the cookies, each with their own symoblism. These cookies are widely popular across the Arab world, especially during holiday seasons and are often found in local Middle Eastern markets or baked at home for special events and family gatherings.
The traditional way of making maamoul cookies involves special wooden molds or shaping tools, but you can also shape them yourself, using the palm of your hand to gently press the filled dough into shape, and creating a design with a fork before baking.
Maamoul, the round, date filled cookies are said to represent the crown Jesus wore on his head as he walked to get cruicifed
Ka’ak, the nut filled cookies, are said to represent 2 things, the sponge that Jesus was offered that was soaked in vinegar when he asked for water, and also the stone that was moved when Jesus was resurrected.
The Cultural and Religious Significance of Maamoul
Maamoul is deeply rooted in Arab culture, particularly in religious celebrations. These cookies are an essential part of both Muslim and Christian traditions, enjoyed during festive periods Easter Day and Eid al-Fitr, which marks the end of Ramadan, when they are often shared among families and communities.
For Arab Christians, maamoul is a staple during Easter and other religious feasts. Many Orthodox and Catholic families make these in the week leading up to Easter Sunday, filling them with date paste or nuts, which symbolize prosperity and renewal. The tradition of making intricate designs on the cookies is said to represent different religious symbols as I shared above, with specific patterns distinguishing date-filled cookies from nut-filled ones.
For Muslims, preparing and sharing maamoul during Eid al-Fitr symbolizes generosity, hospitality, and gratitude. After a month of fasting during Ramadan, these sweet, rich cookies serve as a reward and a way to bring loved ones together. Families gather to bake large batches to share. It’s common for neighbors and relatives to exchange plates of maamoul as a gesture of goodwill and blessings.
Maamoul’s history goes back centuries, with some tracing its origins to the Levant region, where wheat, dates, and nuts were commonly used in desserts. The intricate patterns and decorative molds used today have been influenced by various Middle Eastern civilizations, including the Phoenicians and Ottomans, who brought their own flavors and styles to this beloved treat.
Ingredients for Maamoul Cookies
For the Dough:
- Fine semolina flour
- All purpose flour
- Unsalted butter, melted
- Salt
- Powdered / confectioners’ sugar
- Teaspoon of sugar (to activate yeast)
- Mastic (Arabic gum) (optional)
- Mahlab (a Middle Eastern spice made of the ground seeds of the St. Lucie Cherry)
- 1 teaspoon of sugar
- Yeast
- Water
- Whole milk
- Orange blossom water or rose water (optional)
For the Filling:
- Date paste (or fresh dates blended in a food processor)
- Melted butter (or clarified butter / samneh for extra flavor)
- Ground cinnamon
- Ground nutmeg
- Salt
- Orange blossom water
For Nut Filling (Optional):
- Nuts of choice (I usually go for pistachios or walnuts)
- Powdered sugar
- Water
How to Make Maamoul Cookies
Step 1: Prepare the dry ingredients
In a large bowl, mix the fine semolina flour, all purpose flour, powdered sugar, salt and the melted butter and use your fingers to rub it into the flour mixture until it forms a soft, crumbly texture. Cover the bowl with plastic wrap and let the dough rest at room repterature for 12 hours, overnight or even up to 2 days. This allows the dry ingredients to really absorb all the butter. Letting the dough rest is crucial, as it helps develop the texture needed for that signature delicate pastry. Every 6 hours or so, the dough will need to be worked together with your hands. The first time you touch the dough, it will be hard, take the hard chunks, break them apart and rub them between the palms of your hands to crumble it back into a flour again.
Step 2: Prepare the dough
After the dough has sat for at least 12 hours and been worked together by hand, combine some lukewarm water with a couple teaspoon yeast and sugar and let it sit for a couple minutes to bloom. Add this into the dry ingredients along with the ground mastic (mistka), and mahlab. Add in the milk little at a time and knead the dough to combine being sure to mix from the bottom. If you find any hard clumps while kneading, break the apart with your hands. Once done kneading, there should be no dough left on your hands, it will be bouncy and have moisture. Cover and let this sit for 45 minutes until it rises.
Step 3: Prepare the filling
Create each separate filling by combining all the ingredients for each in a separate small mixing bowl. Depending on how you like to shape the cookies following the two options I shared in the recipe card, you can shape the filling into balls or shape the nut filling into balls and the date filling into thick strings.
Step 4: Shape the cookies
To create the cookies, take a small piece of the maamoul dough and roll it into a smooth dough ball. Flatten it in the palm of your hand, creating a slight indentation in the center of the dough. Place a date ball or nut filling in the flattened dough and gently pinch the dough closed, rolling it into a round shape. From here, there is more than one traditional way to shape them. You can either hand shape them (which my family tends to do) with shaping pinchers or tweezers, or you can press the filled dough into a cookie mold or special maamoul mold to create decorative patterns. If you don’t have either of these tools, use a fork to create simple designs on top of each cookie. The date one should be shaped as a circle to represent Jesus’ crown of thorns, and the nut filled cookies should be in the shape of a dome to represent the sponge with vinegar He was given and/or the stone that moved from the cave when He was resurrected.
Step 5: Bake the Maamoul
Preheat your oven to 400F. Arrange the cookies on a prepared baking sheet lined with parchment paper or a cookie sheet. Bake for 15-20 minutes, or until the cookies are golden brown. Remove from the oven and let them cool on a large tray before dusting with powdered sugar.
Storing and Freezing Maamoul
Storing: Once cooled, place the maamoul cookies in an airtight container at room temperature. They will stay fresh for a week or two.
Freezing: If you’d like to make a large batch ahead of time, arrange the baked cookies in a freezer bag or an airtight container and freeze them for up to three months. Don’t overfill the bag to be sure the cookies don’t crumble. You worked too hard for those babies to be smashed together! Also, be gentle when placing them in your freezer and try not to place anything on top of them as well. To enjoy, simply thaw at room temperature before serving.
Tips for the Best Maamoul Cookies
- Rest Period: Letting the dry ingredients rest ensures a tender, melt-in-your-mouth cookie and gives it the perfect texture without being crumbly.
- Use Fine Semolina AND all purpose flour: This creates a delicate and soft texture.
- Don’t Overbake: Keep an eye on the baking process—you want them golden, not too dark.
- Experiment with Fillings: Try different variations like figs, almonds, or even chocolate for a twist on this classic Middle Eastern cookie.
Whether you make them for Easter Day, Eid al-Fitr, Christmas, or just because, this easy maamoul recipe is a sweet reward worth the effort. Each bite of these date-filled cookies or nut-filled treats is a taste of history, tradition, and the love that goes into baking them. They’re the perfect balance of buttery, crumbly texture and sweet filling. I’m so excited for you to make these celebratory cookies in your home, I just know you will love them! Happy Easter or Happy Eid!


When you make this maamoul, comment down below and rate this recipe to let me know your thoughts! Also, share a picture or tag me on Instagram @thebitewithjackie, I love seeing your remakes!
Ka’ek & Ma’amoul Cookies for Easter!
Equipment
- Equipment needed:
- Decorative tweezers (as shown in the video)
- Decorative cookie molds (as shown in the video) OR a fork
- A wooden cooking spoon
Ingredients
For the dough:
- 2 cups fine semolina MUST be fine semolina and not coarse
- 2 cups all purpose flour
- 1 ½ cups butter melted but not hot
- ½ teaspoon salt
- ½ cup powdered sugar
- 1 tablespoon granulated sugar
- 1 teaspoon mastic optional ** See note
- 1 ½ teaspoons ground mahlab
- 2 teaspoon yeast
- ½ cup lukewarm water
- 4 tablespoons 1/4 cup milk
For the date filling:
- 1 – 13oz package of baking dates
- ½ teaspoon cinnamon
- ¼ teaspoon nutmeg
- ¼ teaspoon salt
- 1 tablespoon butter samneh or a neutral oil (like vegetable or avocado oil)
For the nut filling:
- 1 cup ground nuts of choice I used pistachio and walnut fillings
- 3-4 teaspoons powdered sugar
- 2-3 teaspoons water
Instructions
- Start with the dough. Mix together the semolina, flour, powdered sugar, salt and melted butter. Combine everything very well so all the dry ingredients are saturated by the butter. Let this sit covered with plastic wrap for 12 hours or overnight. Use your hands once every few hours to fluff up the mixture and let it breathe. The dough will be hard when you touch it the first time, but break apart the chunks with your fingers and the palms of your hand (watch my YouTube video linked above for a visual).
- After 12 hours or so has passed, combine the lukewarm water with the yeast and granulated sugar, let it sit and bloom about 5 minutes. Add that into the dough along with the mahlab powder and mastic powder. Add in the milk 1 tablespoon at a time and knead the dough to combine. Be sure to mix from the bottom so no dry mix is left untouched. Once the dough is done kneading, there should be no dough left on your hands and the dough will be bouncy and have moisture. Let this sit covered for 45 min to 1 hour in a draft free place (typically an oven or microwave that is cool and not in use).
- Create the cookie fillings by mixing all ingredients together for the specific filling. Set aside until ready to form the cookies.
To form the date cookies:
- Option 1: Take about a heaping tablespoon of dough and roll it into a log about 2 inches long. Press your finger down the center of the log to create a dip in the dough. Take a smaller amount of the date mixture and make a log just slightly smaller than the dough. Place the dough in the middle where the dip is from your finger. Cover the date mixture with the dough by pushing down slightly on the date with your less dominant hand, using your dominant hand pinch both sides of the dough together to cover the date. Continue along until the entire date log is covered with the dough. Carefully pinch the ends so the date mixture is not exposed. Roll the dough log again so there are no harsh ends. Bring the two ends together to create a circle and then using the pincher tool, create a design around the entire cookie. This is said to resemble the crown of thorns Jesus wore as he went to get crucified.
- Option 2: You can also take a ball of dough the same size as the previous shape and a ball of the date mixture a bit smaller than the size of the dough. Flatten the dough ball into a circle, place the date ball inside and cover it completely with the dough. Place into a mold to create a design, then slam the edge of the mold on a flat surface so the cookie can come out and reveal the design.
To form the nut cookies:
- You can do option 2 or option 3: Take the same ball of dough stuffed with the nut mixture that you would have from option 2 and use the decorative tweezers to create a design around the entire cookie. This is said to resemble the sponge of vinegar Jesus was given while on the cross when he said he was thirsty.
- Preheat the oven to 400F. Bake the cookies for 15-20 minutes or until golden brown on top and edges. Enjoy & Sahtein!


Jackie, I made your recipe for my family and extended family and received multiple requests for your recipe and even more phone calls saying these were the best they had ever tasted. Thank you so much for sharing! Looking forward to trying more of your recipes.
Thank you so much for trusting my recipe! I do think they’re up there with some of the best as well! I’m so happy you all enjoyed them!!
Absolutely hooked on this Eid cookie recipe! It tastes exactly how my momma makes it! I add rose water to the date mix and some vanilla powder to the Dough (recommended additions by my mama). But other than that I follow the recipe step by step and it’s been amazing each time!
Love those additions! So happy this recipe is a part of the holiday season for your family! Thank you for the sweet comment!
This is the second year I use this recipe. It’s so good and has the perfect crumble!!! I added sesame seeds to the date paste just because I’ve seen others do that. The dough came out a little more watery than last year I just added more flour and it fixed the problem.
I’m so happy you love this recipe as much as I do. Thank you for trusting my recipe 2 years in a row! Hmm I wonder why it came out more watery this time. I’m glad adding flour worked out for you!